

DaVinci Resolve 21 is now in its final release, and its new Color page and AI tools add several practical improvements for colorists and editors. The most notable additions include AI CineFocus, AI Blemish Removal, AI Face Reshaper, AI UltraSharpen, Magic Mask Render in Place, Layer List View, Group Color Grade Versions and MultiMaster Trim Manager.
This guide focuses specifically on the DaVinci Resolve 21 features that matter for day-to-day color and finishing work rather than covering every new feature in the application.
DaVinci Resolve 21 Features: Quick Takeaways
- AI CineFocus: Adjust the apparent focal point of footage with AI-assisted depth and focus controls.
- Magic Mask Render in Place: Render a tracked Magic Mask as an external matte to reduce processing during continued grading.
- AI Blemish Removal: Reduce superficial skin imperfections while retaining natural skin texture.
- AI Face Reshaper: Adjust facial features on a moving subject after face detection and tracking.
- AI UltraSharpen: Recover and enhance fine detail in soft or slightly out-of-focus footage.
- Layer List View: Organize Color page nodes in a cleaner list-based view.
- Group Color Grade Versions: Create and switch between multiple grade versions for groups of clips.
- MultiMaster Trim Manager: Create multiple HDR and SDR trim deliverables from a single timeline.
Each feature below is rated on three practical factors:
- Difficulty: the learning curve, from ⭐ to ⭐⭐⭐⭐.
- Tier: whether the feature is available in the free version or requires DaVinci Resolve Studio.
- System load: an editorial estimate of hardware impact, from 1/5 (light) to 5/5 (heavy).
I’m Ali, a DaVinci Resolve trainer, and this is my practical breakdown of the features most relevant to real-world color and finishing workflows.
DaVinci Resolve 21 AI and OpenFX Tools
AI CineFocus
Difficulty: ⭐⭐⭐ | Studio only | System load: 4/5
AI CineFocus lets you adjust the apparent focal point of a shot after it has been recorded. It is designed to create a more convincing focus adjustment by using depth information and lens-style focus effects.
How to use it: Add AI CineFocus from the Resolve FX tools to a node. Use the available depth and focus controls to isolate the subject, then adjust the focus position and related blur or bokeh settings to create the desired result.
Practical note: CineFocus is computationally demanding, so test it on representative footage before using it in a heavy production timeline.
Magic Mask Render in Place
Difficulty: ⭐⭐ | Studio only | System load: 4/5
Magic Mask Render in Place is one of the more practical workflow improvements in DaVinci Resolve 21. It lets you render a tracked Magic Mask as a separate matte, reducing the need to repeatedly process the original tracking data while you continue working.
How to use it: Create your Magic Mask and complete the tracking. Open the palette’s three-dot menu and choose Render in Place Magic Mask. Resolve creates an external matte that can be used by the grading workflow.
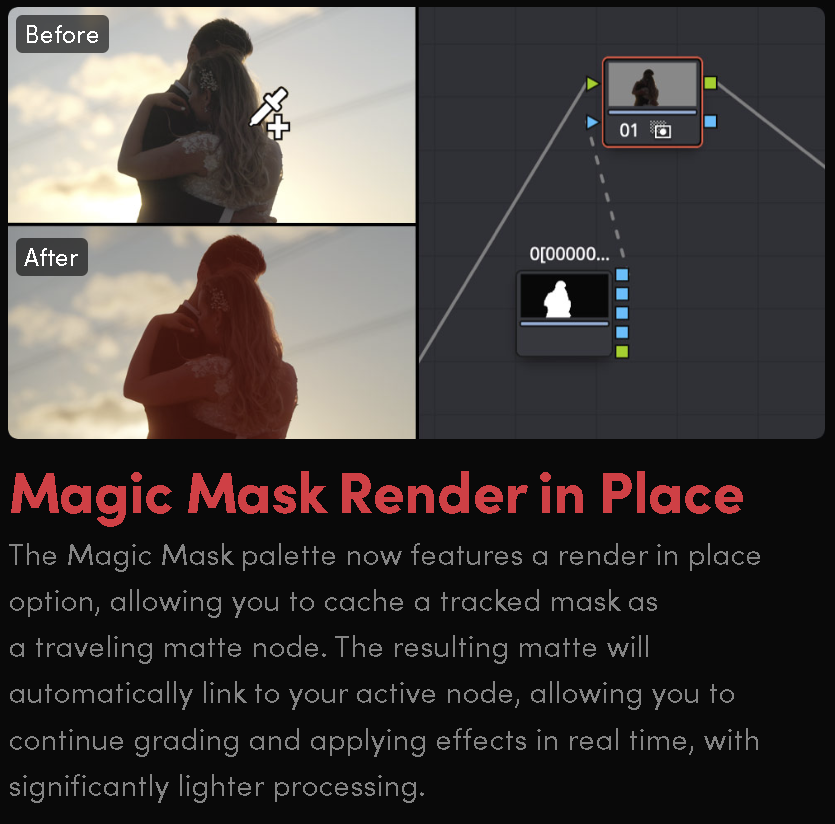
Why it matters: Rendering the tracked mask can make continued grading and effects work more responsive because the mask does not need to be recalculated in the same way during every interaction.
AI Blemish Removal
Difficulty: ⭐⭐ | Studio only | System load: 3/5
AI Blemish Removal is designed to reduce the appearance of superficial skin imperfections while retaining natural skin texture.
How to use it: Add AI Blemish Removal to a node and adjust its controls to determine how strongly the effect is applied. The AI-based processing detects facial areas and helps automate part of the cleanup process.
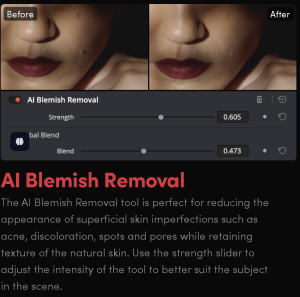
Practical note: Keep the correction controlled. Excessive skin cleanup can make a subject look unnatural, so check the result at normal viewing size as well as close up.
AI Face Reshaper
Difficulty: ⭐⭐ | Studio only | System load: 3/5
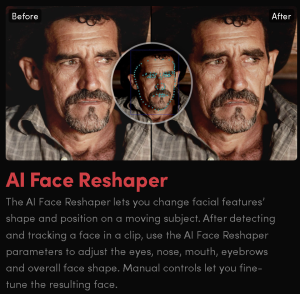
AI Face Reshaper allows you to adjust the shape and position of facial features on a moving subject after Resolve detects and tracks the face.
How to use it: Apply the effect and allow Resolve to detect and track the face. You can then adjust features such as the eyes, nose, mouth, eyebrows and overall face shape using the available controls.
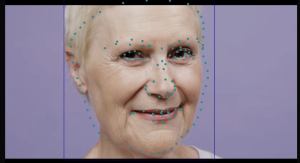
Supporting tracking view: The following image shows facial landmark detection/tracking that can be used to illustrate how the face is analyzed before adjustments are applied.
A caution: Keep structural changes subtle. Heavy adjustments can become distracting or introduce unwanted artifacts, particularly when the subject moves significantly through the frame.
AI UltraSharpen
Difficulty: ⭐⭐⭐ | Studio only | System load: 4/5
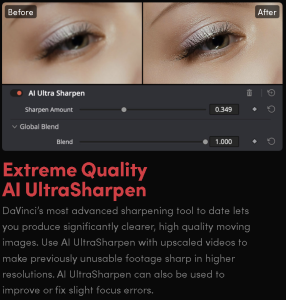
AI UltraSharpen is designed to improve the perceived detail of soft or slightly out-of-focus footage. Blackmagic Design describes it as a high-quality sharpening tool that can also help with slight focus errors.
How to use it: Add AI UltraSharpen from the Resolve FX tools and choose the appropriate processing settings for your footage. The effect can be computationally demanding, so caching may be useful when working with complex timelines.
Practical note: Sharpening cannot recreate genuine detail that was never captured. Use the effect carefully and check for halos, excessive texture or other sharpening artifacts.
DaVinci Resolve 21 Color Page Workflow Enhancements
Layer List View in the Node Editor
Difficulty: ⭐ | Free and Studio | System load: 1/5
Layer List View changes the Color page node editor into a more organized list-based layout. Nodes are displayed in rows according to their position in the node graph, making complex node structures easier to manage.
How to use it: Right-click the Node Graph background and select the Layer List view. You can then work with nodes in a cleaner vertical layout instead of relying entirely on the traditional node graph view.
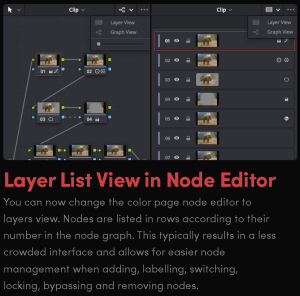
Why it matters: This is particularly useful when a grade contains a large number of nodes and the traditional graph becomes difficult to navigate.
Group Color Grade Versions
Difficulty: ⭐ | Free and Studio | System load: 1/5
DaVinci Resolve 21 adds support for multiple grade versions when working with groups. This makes it possible to maintain different versions of a group grade without rebuilding the entire setup.
How to use it: Right-click a clip that belongs to a group and use the Group options to create or select a grade version. Versions can be used for the pre-clip and post-clip node graphs, and the selected version affects the clips in that group.
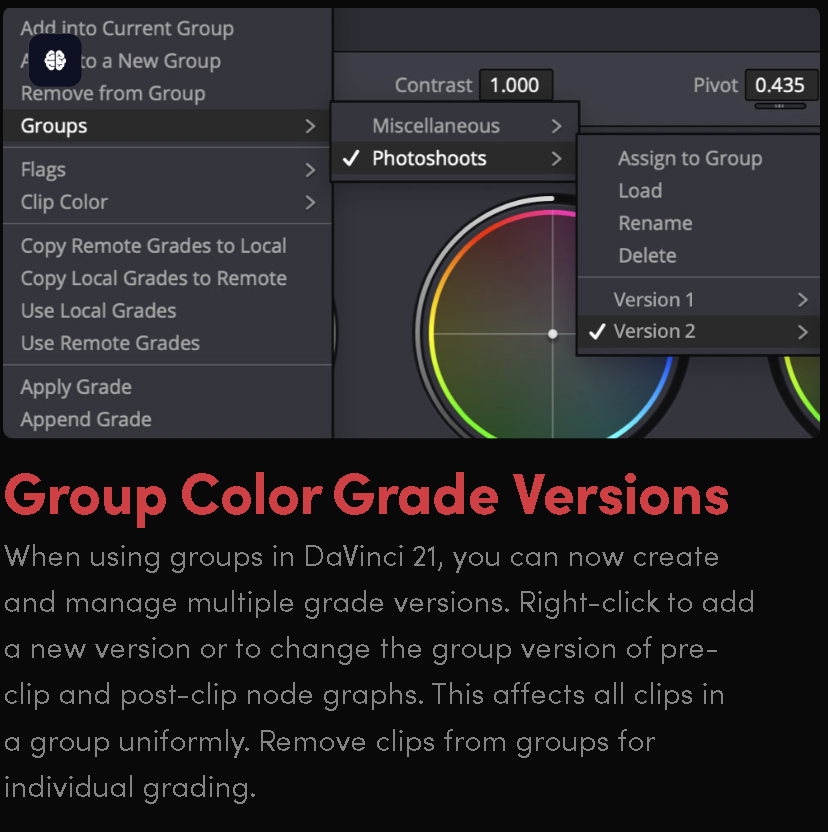
Practical use: This can be useful when you need to maintain different creative or technical grade variations across a group of related clips.
MultiMaster Trim Manager
Difficulty: ⭐⭐⭐⭐ | Studio only | System load: 2/5
MultiMaster Trim Manager is designed for workflows that require multiple deliverables from the same timeline. It allows colorists to create multiple HDR and SDR trim versions while maintaining a common base grade.
How to use it: Enable the MultiMaster workflow and use the additional trim layers in the Color page node editor. Build the base grade first, then create the necessary trim adjustments for each deliverable or output standard.
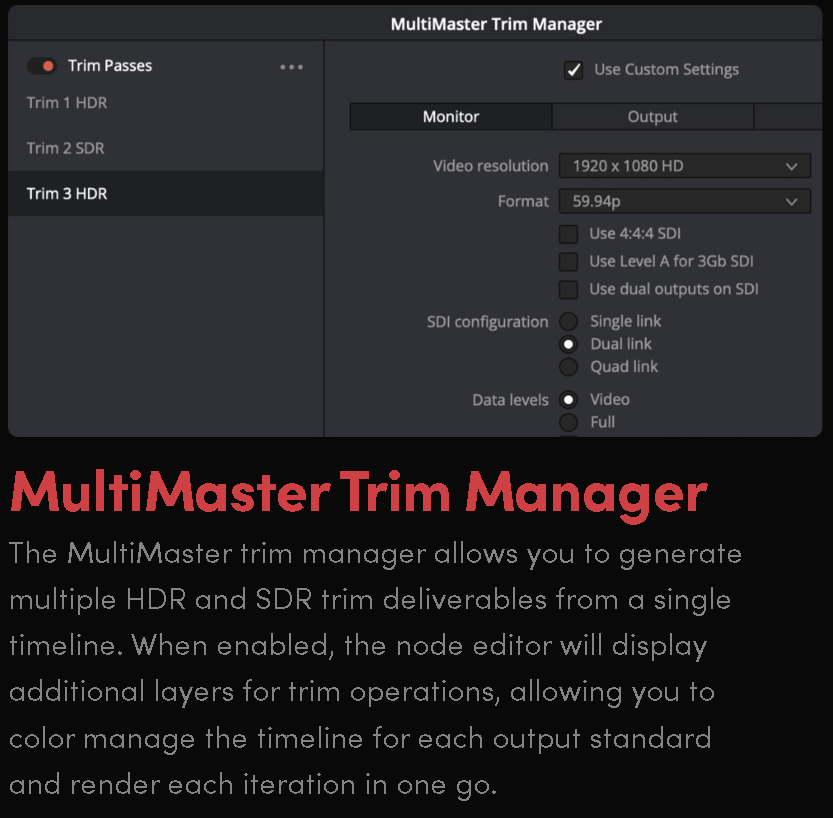
Why it matters: Instead of maintaining completely separate grades for different deliverables, you can work from a common timeline and apply additional trim adjustments where needed.
Film Look Creator Refinements
Film Look Creator
Difficulty: ⭐⭐ | Studio only | System load: 3/5
DaVinci Resolve 21 also includes refinements to the Film Look Creator workflow. The tool provides additional controls for creating and refining a film-style appearance, including adjustments related to softness, contrast and film characteristics.
How to use it: Apply Film Look Creator to a node and experiment with the available film and image controls. Use the new options to fine-tune the character of the image rather than relying entirely on a preset.
Practical note: Film-emulation effects are highly subjective. Compare the processed image against the original and make sure the look supports the project’s intended visual style.
Which DaVinci Resolve 21 Features Should You Try First?
The right features to adopt depend on your workflow, footage and hardware. For a lighter workflow change, Layer List View and Group Color Grade Versions are relatively straightforward additions. For AI-heavy work, CineFocus, AI UltraSharpen, Face Reshaper and Blemish Removal should be tested on your own footage before being introduced into demanding production timelines.
Magic Mask Render in Place is particularly useful when tracked masks are creating a processing bottleneck because the rendered matte can reduce the need to repeatedly process the original mask tracking.
MultiMaster Trim Manager is more specialized and is most relevant when you regularly create multiple HDR, SDR or other trim-based deliverables from the same timeline.
Frequently Asked Questions About DaVinci Resolve 21
What are the main new DaVinci Resolve 21 features for colorists?
The major Color page workflow additions include MultiMaster Trim Manager, Layer List View in the Node Editor, Group Color Grade Versions and Magic Mask Render in Place. Resolve 21 Studio also adds several AI-powered tools relevant to image and facial refinement.
Is CineFocus available in the free version of DaVinci Resolve 21?
CineFocus is a DaVinci Resolve Studio feature. Blackmagic Design lists CineFocus among the new AI tools included with the Studio version of Resolve 21.
What does Magic Mask Render in Place do?
Magic Mask Render in Place renders a tracked Magic Mask as a separate matte. This allows the resulting mask data to be used in the grading workflow without relying on the original tracking process for every interaction.
What is MultiMaster Trim Manager used for?
MultiMaster Trim Manager is designed for creating multiple HDR and SDR trim deliverables from a single timeline. It adds additional trim layers to the Color page node editor so you can make output-specific adjustments.
Is AI UltraSharpen useful for out-of-focus footage?
AI UltraSharpen is designed to improve the perceived detail of soft or slightly out-of-focus footage. However, sharpening cannot recover genuine image information that was never captured, so results depend on the original footage.
Go Deeper Into DaVinci Resolve Color Management
Want to understand color management before working with these newer AI and Color page tools? Check out my REC.709 vs LOG vs RAW breakdown.
If you want hands-on guidance, you can also explore my DaVinci Resolve training programs.
Further Reading and Resources
- DaVinci Resolve 21: What’s New – Blackmagic Design
- DaVinci Resolve 21 New Features Guide – Blackmagic Design
Questions or topic requests are welcome in the comments. For more practical DaVinci Resolve color-grading and post-production guides, explore the rest of the site.